Just like why we have an annual fire drill in the factory is to refresh our memory of the fire procedures.
Don't wait around for someone to come to save you like a damsel in distress, there are times when you find yourself in a remote location and not many are willing to stop and help.
 |
| A damsel in distress..."Here I come to save the day! |
Ah, why do I need to learn this? All I have to do is make a call to someone to fix this for me but think again what if no mobile signal can be sent in or receive?
Changing a tire is easy enough for those who know how, and everyone should have a clear idea of what's involved:
1.
 |
| Before starting to change your wheel, think about safety first! |
It is necessary to take the necessary safety precautions:
- First, turn on your emergency flashers or hazard lights. This will alert passing motorists that you’re there as well as you need assistance.
 |
| Some driver turning on their car's hazard warning lights during a heavy downpour which used incorrectly. The purpose the hazard light may be used only when the vehicle is stationary. |
- If you have children with you make sure they stay with you at all times. Never know when they will be run into the road.
- Place emergency triangles behind your vehicle to alert other drivers.
 |
| At least one emergency warning triangle should be carried in every vehicle. You place the warning triangle on the road at least 50 yards/ 45 meter(3 cars) behind your vehicle. |
- If you do not have a emergency triangle, use tree branches as warning triangles, this is usually fine in daylight but do remember to remove it afterwards.
- Secure the vehicle so that it won't roll by:
1. Make sure the parking brake is set firmly.
2. With manual always parked in gear, if facing uphill it is best to use reverse, and if facing downhill, use first. Automatics usually have parking pawls that engage when the car is in "park"mode.(either downhill or uphill)
3. As a safety precaution, I always keep in my car, a wooden wedge to block the wheels at the opposite end of the car from the end that is to be raised.
 |
| Place the wedge in front of tyre of back depends on whether your car facing uphill or downhill |
 |
| Loosen in a star-patterned order |
 |
| Take advantage of gravity to loosen the lug nuts while the car is on the ground |
 |
| Remember left turn (counter clockwise) is loose, right (clockwise) is tight remember that and you'll never have a problem with any lug nut |
Apply all your weight to the bar on the left. This action starts turning the nut in the opposite direction the nut or counterclockwise, which loosens it. Don't remove the lug nuts completely at this point. Simply loosen them, until it's enough to remove with your fingers.
If you have stubborn locking lug nuts stuck on because of rust, over-tightening,hit it with a rubber hammer or put some WD-40 on the lug nuts and let them sit for about an hour to loosen the joint. (Use this only as a last resort.)
3
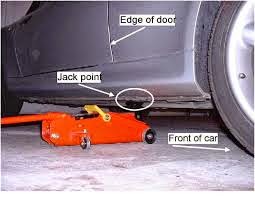
 |
| Jack up the vehicle about 6 inches off the ground. Ensure the vehicle is park on a solid level surface. |
Most cars can be jacked on the outside frame, or the thin lip around the bottom of your car. Position the jack so that the side where the metal bar is inserted is facing you.
4. Remove the flat tire.
As you pull the flat off, it should slide along the bolts until it clears the end of the bolts and you find yourself supporting its full weight. Roll the flat along the ground to the rear of the vehicle to get it out of the way.
Put them in a safe place,somewhere they won't roll away. Alternatively, you can place it under the car, just in case your jack gives way and drops your car.
5. Lift the spare onto the lug bolts.
 |
| Use your feet to help lift the spare tire onto the wheel studs. |

Place your spare tire in front of the wheel, align it with the wheel bolts, and then add your lug nuts. Turn the lug nuts clockwise by hand as tightly as you can with only your hand.
6. Lower the vehicle and tighten the lugnuts.
 |
Note: There are different tightening sequences for 4- and 5-lug wheels. Tightening the nuts in the proper sequence ensures that the wheel mounts properly and that the stress is evenly distributed over the wheel.
 |
| Wait Wait...I'm Not Done Yet! |
7. Replace the wheel cover or hubcap.
If your car has wheel covers with a delicate finish, the owner's manual should provide instructions for replacing it. If your car has hubcaps, place the hubcap against the wheel and whack it into place with the heel of your hand. Cushion your hand with a soft rag first so that you won't hurt it. And don't hit the hubcap with a wrench or hammer, you'll dent it.
Caution: Nowadays spare tires are not full-size, normal tires. These smaller spares can't be driven at normal speeds and should only be driven for short distances. After changing your tyre, make sure you send your punctured tyre to your local tyre shop at your earliest convenience, you wouldn't know when is the next flat tyre going to happen.
Getting a flat tire every now and then might be unavoidable, but you can decrease your chances of flat tires on a road by simple ways:
1. Always check your tyre pressure approximately once a week and the make sure the wheels are properly aligned. Get a tire-pressure gauge to measure the pressure of tires on all wheels when your tyres are cold.
 |
| A tire- pressure gauge is a relatively inexpensive tool drivers should own to alert drivers their air pressure was low. You simply cannot guess by kicking a car-tire with your foot or pressing your hand against the tire to estimate how much air pressure is inside. |
2. Don't forget the spare! I always had that 'quick peek' to make sure the tyres are fine every morning before I drive off.
3. If your steering wheel does not return easily after a turn, your tires are often the first indication that something is wrong with your car.
4. If your tire pressure drop not long after you have top up your tire pressure, this symptom will indicate your tyre hits a sharp object, usually an old, rusty nail but leaking slowly. Go to your tyre shop and ask the foreman to check. Usually they will pour a little of this soap water onto the tire to notice whether there are any bubbles appearing in one place. If a confirm they still have to take out the tubing and fill it and quickly put it in a filled bathtub or pool cause you never known there is more than one spot that leaking. After locating the hole(s), patching the tube can be done confidently.
Lastly, make sure your tyres there is plenty of tread, this is due to the only part of the vehicle that grips the road. Also rotating the tyres between front and back can also ensure your tyres last longer.
No comments:
Post a Comment